“Success is no accident.” ~ Pele
What do you do when Photoshop CC fails to stack images they way you need it to?
If the Auto-Aligning and Auto-Blending Layers options in Photoshop CC produce odd pockets of sharpness and blur that make a mess of what you want the finished image to look like—what are your options?
First off, accept that the issue might be YOU and the series of captures you’re trying to stack. That’s been my problem many, MANY times. If you haven’t captured sharpness throughout the image series to cover the areas you want sharp, Photoshop can only work with what you give her.
But if your confident you’re capturing the needed sharpness , and you’re still not getting the results you want when using PS’s automated process to merge captures into a single image…
Well, then it’s time to learn a different way, right?
A while back, on the Georgia Nature Photographer’s Facebook page I posted this “sort of” manually stacked series that was giving me fits. I asked if there was any interested in my sharing how I created the final result, using Photoshop CC’s Auto Aligning and Auto Blending features, but in a more manual way (manipulating the images with layers, so I had more control over what I needed focused and what I didn’t) . The answer was a resounding YES. So look for this weekly Manual Focus Stacking series from now until I’ve bored you into submission, LOL.
What was the problem with this image? I’d captured 10 images of these blooms, wanting each blossom to be in sharp focus, while keeping my background as soft and dreamy as possible. I was playing with a new-to-me Nikon 60mm 2.4 macro lens, and I was in love with the swirly bokeh it created.
No problem, right? Using PS’s Auto Align and Auto Blending, I’d combine the individual captures into a single image that was sharp and soft where I wanted it. Eh hem. No.
PS was doing SOME of what I wanted, but leaving numerous pockets of what I didn’t want in its wake. Some of each bloom was in focus. But, randomly it seemed, PS had decided to leave others parts of the same bloom blurred. Plus, the automated blending process had chosen to keep the stems of the blooms in sharp focus, and I wanted them blurred.
My various layers of different focus were competing with each other and creating an automated mess. It was time to take that process apart, learn what I could do manually with each step, and then put it all back together so I could create the final image I wanted.
Nothing I’ll share in this series is new or “Ta-da!”
I did solve my problem, however. Taught myself a good bit along the way, too. If nothing else, may that inspire you to do the same, the next time they run into a processing roadblock.Hopefully you can learn something about doing sort-of manual focus stacking, too
This week’s post is mostly introduction to the series. More detail will follow in the later segments, including:
Breaking a series of auto-aligned images into “focus buckets”
Focus stacking these buckets separately
Manually merging these stacked buckets creating, a better focused whole
Processing and “cleaning” up tips once you have your focused areas as sharp as possible
Sound a little too easy to be true. At a high level, “sort-of” manually stacking images isn’t a complex process. In theory. Then there’s putting that theory into practice.
Of course there are more steps involved. Often trial and error is required to get it right. You’ll be switching back and forth between what PS does for you and what you need to do for yourself. This is basic problem solving with a twist. Both a technical and a creative approach. You’ll be making decisions and choices and taking back some of the control you might prefer to leave on PS’s plate.
Stick with it. The result will be you feeling more in control than ever of your next focus stack project. Success will no longer be at the whim of a purely automated process. You’ll have more manual tools in your processing belt to work with, when an image refuses to cooperate on its own.
That’s what I call win-win time well spent!
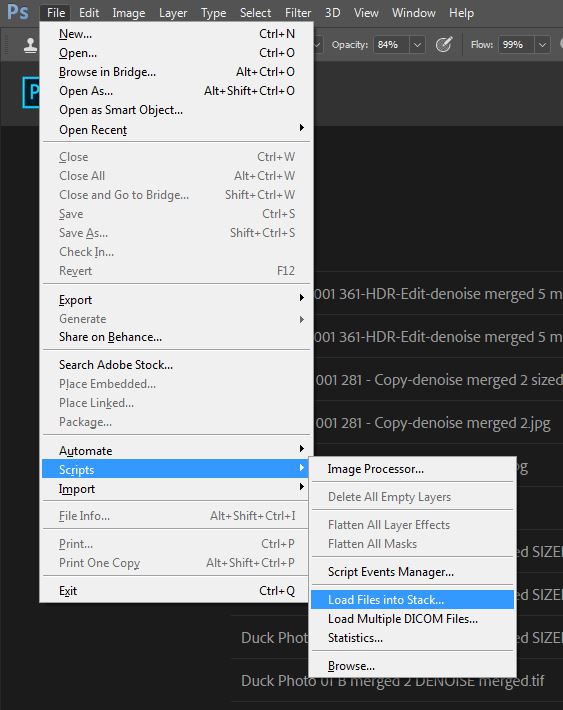
Before I go, let’s introduce PS’s Load Files Into Stack script.
Photoshop CC’s Load Files into Stack script.
It’s an important little jewel hidden under the File menu that most of us never knew was there—if, like me, you’ve been using Lightroom CC’s Open as Layers in Photoshop option to achieve your initial stack of images in Photoshop CC.
It’s a great little PS script that I encourage you to play with between now and next week.
When we get to breaking out buckets of images from your complete stack, and blending those images together separately, this script will play a starring role.
With it you can stack any series of images (as well as break out images from within a series into groups that you can work with separately).
To access it, select the following:
File ~ Scripts ~ Load Files into Stack…
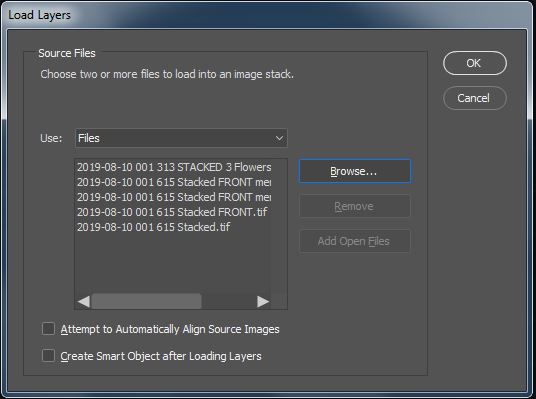
From the Load Files box that appears, Browse for the files you want to stack (leaving the boxes at the bottom of the unchecked for now).
The result will be what you’d see if you’d used Lightroom to bridge to PS and run this script for you—if you’re experienced with basic PS focus stacking, you can Auto Align and Auto Blend from there.
As for “sort of” manually stacking images… We’ll be using this handy script a bit differently not too far down the road. So put it in your back pocket until we’re ready to use it.
Next Up: We’ll create “buckets” of images from a larger focus stack series—so we can tell PS which areas we want crisp and clear, and where we want our lovely bokeh to rein.
Until next week, ask any questions you have in the comments!


